Thank you for taking part in my Graphics School, I hope you have fun and learn what you came for with ease. So without further delay........My Layout tutorial!!!!!!
* Shout out to Todd Klassy on 500px for teaching me about different ways to find free photos to use on the internet!*
*Disclaimer* This is how I make my layouts and is in no way how you have to do it. There are many other tutorials out there and plenty of options to do what you want. I am not forcing you to make a layout nor am I forcing you to do it my way. I am *not* endorsed by any of the sites mentioned. I love each of these and use them because they give me what I want and are very simple to use. :)
*Disclaimer* This is how I make my layouts and is in no way how you have to do it. There are many other tutorials out there and plenty of options to do what you want. I am not forcing you to make a layout nor am I forcing you to do it my way. I am *not* endorsed by any of the sites mentioned. I love each of these and use them because they give me what I want and are very simple to use. :)
1: An Image
The first and most obvious step in making a layout is to find your image. Now there are countless whys to find a photo on the internet, but you have to go about it properly. The best and most widely know is DeviantArt, but there are of course other options that I will teach you as well.
So let's get started with the first Lesson on how to make a Layout!
So let's get started with the first Lesson on how to make a Layout!
Finding an Image on DeviantArt (aka: DA)
Once you are on DeviantArt.com you are going to go to the search bar and type in whatever you are looking for, but keeping in mind to include the word 'stock' at the end of your search. Why 'stock'? Adding the word 'Stock' helps narrow down the more available images to use, but you can always search without 'stock', finding images that you can use will just be a little bit harder. Because you are going to alter this photo and use it for your personal use you need to find an image that allows you to do so, hence 'stock'. Now not all photos that pop up will be available for any use. That's why you need to read the artist's terms and uses in the description box or their profile. In some occasions Deviant's won't allow anyone to use there image, but a lot of the time they will let you use the photo as long as you credit them (we will get to that in another section) If you already know how to credit Awesome! If not, come back soon for our lesson on proper crediting or perhaps ask in the Presentations & Layout Help topic in the Events forum.
Finding an Image on Flikr
I love Flickr, a lot of people like DA and use it all the time but my personal favorite is Flikr. So let's jump on in!
First you will want to follow this link, it will take you to the Creative Commons (CC) search, there you will see all the different CC license types. The easiest option to choose is the Attribution license, all you have to do is add image credit! But another good option is Attribution-Noncommercial. Once you have your license chosen, click on the "See more" link below it.
Okay, now search for your term (i.e. horse), then to double check select the "advanced" option and select only those with CC license at the bottom and search. Next you want to change the way you sort them. Go from "relevant" to "interesting". Generally better images will pop up to the top for you to view.
Now you just have to look for your desired photo. Keep in mind it's still a good idea to go the extra mile and contact the owner of your chosen image, to let them know what you are doing with it and to insure you are giving them credit.
Finding an image without required Attribution:
Here is my last option. Follow this link to Google images and enter "horses" (for example) and then click on SEARCH TOOLS. There you will see an option for USAGE RIGHTS. Click on that and chose your desired license or usage type. Again I suggest either choosing, "Labeled for Reuse" or "Labeled for Noncommercial Reuse".
Here we go, last section of the first part my How to make a Layout class.
Once you have found an image you like and are aloud to use by the artist's permission you need to figure out if it's going to work as a layout or not. This can be kind of tricky, I know from experience customer's will give me a heavily detailed description of what they want, I will find a good enough image but alas there is no room to properly fit all the boxes, quotes, ect. that they want. So you need to make sure your photo is roomy enough for everything that you want. Example:
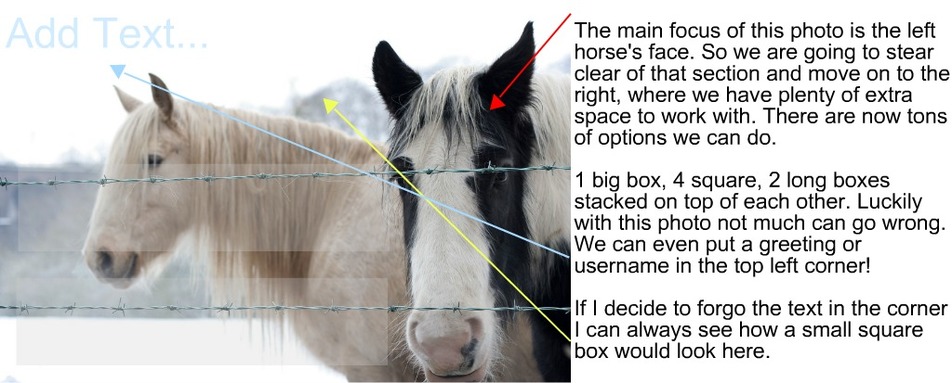
The main point is that you need to make sure your image and boxes flow together, like the boxes belong with that photo. this takes practice and time to learn. Even I still don't always get it right, but with practice comes perfection (right? lol).
All right that it's for my first class on how to make a layout! Be sure to check out Part 2: Editing. Thanks again for viewing my tutorial, I hope you find it helpful and will keep visiting for more tips!
See ya'lll around!
All right that it's for my first class on how to make a layout! Be sure to check out Part 2: Editing. Thanks again for viewing my tutorial, I hope you find it helpful and will keep visiting for more tips!
See ya'lll around!
Comment Form is loading comments...
